


If you don't think that color speaks just complete this sentence, "red means ---- and green means ?" even a child will know what red means stop and green means go. If such simple ideas work for all of a given culture or market what could it mean to the graphic design of your website, brochure, or product if you know some of this information.
First let's start with the basics. The color wheel. We've all seen it. The color wheel shows the basic colors, each wheel is different in how many shades of each color is shown, but they are essentially the same.
Color harmony, colors that go together well. These will be colors that are next door to each other on the color wheel. Such as blue and green. In reference to clothes these colors match each other. Instinctively most of us know which colors go together when we dress ourselves every morning.
Color complements, colors that set each other off, they complement each other. These are colors that are opposite on the color wheel. Such as blue and orange.
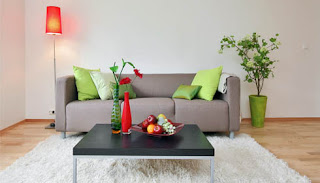
Color depth, colors can recede or jump forward. Remember that some colors seem to fall back such as blue, black, dark green, and brown. Other colors will seem to step forward such as white, yellow, red, and orange. This is why if you have a bright orange background it may seem to fight with any text or images that you place on it. The orange will always seem to move forward.
Now you have the basics so let's go further. Just because to colors go together or complement each other doesn't mean that yo necessarily want to use them on your project. I opened this article with the meaning of colors now here is an example, keep in mind this is one example from western culture.
Color Survey: what respondents said colors mean to them.
- Happy = Yellow
- Inexpensive = Brown
- Pure = White
- Powerful = Red (tomato)
- Good Luck = Green
- Dependable = Blue
- Good tasting = Red (tomato)
- High Quality = Black
- Dignity = Purple
- Nausea = Green
- Technology = Silver
- Deity = White
- Sexiness = Red (tomato)
- Bad Luck = Black
- Mourning = Black
- Favorite color = Blue
- Expensive = Gold
- Least favorite color = Orange
So you may want to include some research in what colors mean to your target market. Colors that would get the attention of a teen would probably annoy an older person and the colors that appeal to the older person wouldn't get a second look from a young person.
Color may be one of the most overlooked aspects of design.
At first I want to thank Charlie Bradbury, from TheEmbassyVfx, for his courtesy and for every image and info he sent me.
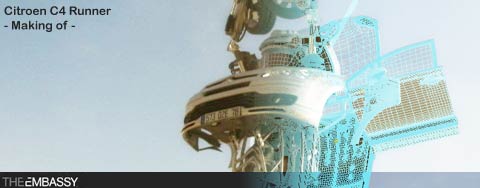
I don’t know if the new Citroen C4 Runner spot is available in all tv’s world.. so, before to start reading the post, here the link to watch this incredible Cg work!
- The Embassy official Site – The first spot on the left
- Citroen C4 Runner : Video sharing site
Following you can read some interesting informations from the email that he sent me some day ago… one more thanks to Charlie Bradbury.
- Citroen C4 Runner: The concept
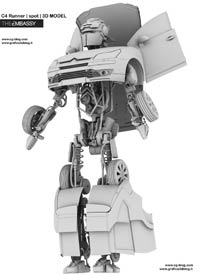 For the Citroen ‘Runner’ spot we had the task of updating the robot and making him functional for the motions that he would be required to perform while keeping the style and feel of the original robot intact.
We went through a series of revisions with the head and leg pieces to find the best balance between look and functionality.
Adding moving gears, joints, springs and hydraulics helped o bring the 3d model to a higher level of detail and add secondary motion.
By working with highly detailed models we find that the shots achieve a level a realism that is only possible when light reacts with complex geometry.
Using Hdri for lightning
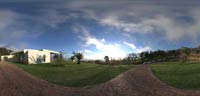
On set a pano-head is used in conjunction with a digital SLR and a circular fish eye lens to capture a high resolution 360 deg image of the surroundings in about 10-12 stops of exposure.
The stops are later stitched and combined together into an HDR image which is used as a source for reflection and extrapolation of light intensities and color (the sun in our case).
- Car Paint Shader
 These flakes sit on the paint at varied angles and cause light to spread as it reflects, hence the soft reflective quality of a silver car on top of a subtle but present diffuse shading effect.
A common mistake is to light this layer as if it were purely metalic.
The higher quality car paints do have a higher concentration of metallic flakes, but are not entirely composed of them.
In our case we used different shading layers:
- a Soft reflection layer that reproduces metalic flakes in the base coat
- a Diffuse layer which simulates the regular flat car paint in which the metallic flakes are mixed with
- a Specular layer
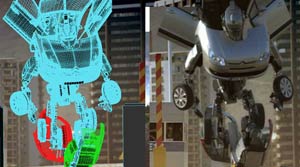
- Tranformation: The beginning
Sections of the robot had to switch from mocap to keyframe animation on demand, while other sections continued to use the mocap data. It was important that the transformation was both physically accurate as a real mechanical machine and look great to the viewer. A low resolution model was used for blocking out the initial animation.
Numerous versions of the transform were created before the final was selected. When the animation was approved for the next stage we moved to the high res version for first light and add all the secondary animation such as the hoses and hydraulics. Problems such as geometry intersecting was either fixed by tweaking the animation or painting out the error in comp.
Animation was also tweaked to reflect areas of the environment that looked best on the surface of the car.
- Transformation: The End
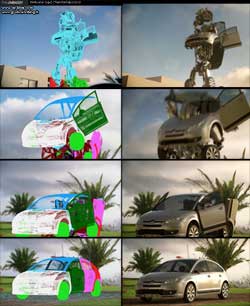 The last shot was the only animation where an F/IK rig was utilized to animate the Transformer.The end framing, where the car was folded up, was posed approximately to match the final car, and the beginning framing was setup in a pseudo stretch pose. The final cg car was imported in as a background object.
A few days were spent first positioning the boned objects to match as closely as possible to the final car position. Then, each car panel and object were keyframed to line up to the car.
Keyframes of the panels were offset a couple frames after the bones, to settle the animation. There were several objects from the interior of the transformer that broke through the geometry.
To hide the penetration, the break-through objects had their visibility animated off. Interior objects, such as car seats were animated separately to form into final position.
Modelling updates to the Transformer were substituted into position as they were completed… and that’s all about Citroen C4 Runner!
Lightining Tutorial and Interior composition with vray render engine
' In this tutorial I mean explain in details the technics I learnt to create a Photorealistic scene. I don't like you reproduce my technic in the same way, but this tutorial could be a starting point to develope your method '
PART I :: Modeling, lightning and vray materials tutorial settings
Modeling1.1 - Start creating 2 parallelepipeds, 10m x 10m, and 10cm thick, with 3m between them. These figures will be the floor and the ceiling in your scene.  1.2 - Now, instead of modeling all the apartment, you will model the walls, windows and doors separately.. Here, for example, I created a little corner with two windows and a main wall.  1.3 - Create a Vray light and put it near the window, then clone it as an "instance" of the other window.  1.4 - When you finish creating the parts, put them all in the scene and obtain the standard scene, where you can start testing your materials. 1.5 - Create a "camera-target" pointing to the center of the scene, with a 42mm focal. You will use this camera as a support for testing your materials.  1.6 - Using the "import" or "merge" function, load a piece of furniture that you have already modeled in another scene.  Tutorial Vray light, settings 1.7 - And God said : Let there be light !... So create a "direct target" light that you will call "Sol", put it in the scene and set intensity, color and active vray shadows. Then set the parameters, as you can see in the scheme below.  Rendering panelsettings: Irradiance map, color mapping 1.8 - Now start setting the vray rendering panel . The goal is to find the best configuration with an average quality, but in a very short time. Select Fixed Rate as antialiasing Activate the Indirect Illumination (selecting ON) In my opinion, the combination Irradiance map / Light cache, is the best one, especially if you consider speed and quality In the Irradiance Map section, select the "medium" preset For now, in the Light Cache area, leave Subdivisions to 100 and activate the Pre-Filter Activate the GI Environement, leaving the Multiplier to 1 Activate the Reflection/Refraction, and set it to 6. The goal is to increase the reflection intensity coming from the exterior. Increase Noise Threshold to 0.05    Shader material settings1.9 - When you have set the lights, go to material settings. I will not enter in great detail, because there are already many tutorials about this topic. Anyway, you will soon be able to see the attached scene [in the next days] 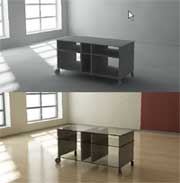 1.10 - When you have set your materials, use this scene to refine all the objects that you will include in the final composition. This step is very important, because you have to check the shader's reaction to the light in the scene. 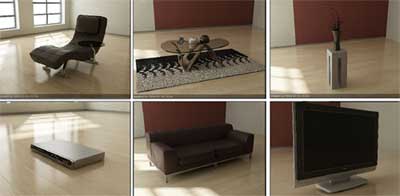 Vray light tutorial stop here. [Coming Soon] PART II :: Scene composition. I will talk about the key elements to be considered in a composition (weight, color, shot) and I will explain how important is to know the composition rules for obtaining a good Rendering. |
Hai... sobat semua jumpa lagi dalam tutorial saya.
Kali ini saya ingin memberikan tips tentang menghaluskan foto hasil seleksi.
Tutorial ini saya buat karena saya masih sering melihat disebuah media, baik itu poster, brosur, majalah dan lain-lain hasil seleksinya masih terlihat kasar atau kurang halus.
Di tutorial kali ini saya akan membahas tentang cara menghaluskan seleksi dengan FEATHER dan SMOOTH.
Oke… sekarang kita mulai saja.
Buka file dengan cara klik Menu : FILE > OPEN
Pilih gambar/foto untuk dijadikan cover.
Seleksi gambar/foto dengan POLYGONAL LASSO TOOL atau dengan PEN TOOL terserah menurut yang sering Anda gunakan.
Setelah terseleksi semuanya, klik Menu : SELECT > FEATHER atau CTRL+ALT+D akan tampil kotak FEATHER SELECTION.
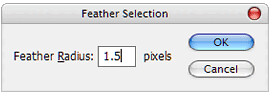
Pada FEATHER RADIUS Isikan 1.5 PIXELS lalu klik OK.
Kemudian klik Menu : SELECT > MODIFY > SMOOTH akan tampil kotak SMOOTH SELECTION.

Pada SAMPLE RADIUS Isikan 2 PIXELS lalu klik OK.
Bila hasilnya masih kurang halus, masing-masing RADIUS masih bisa ditambahkan, tapi jangan terlalu besar nanti malah jadi kabur detail fotonya.
Sekarang lihat hasilnya... halus bukan.
Oke…sekian dulu tutorial dari saya, semoga bermanfaat bagi kita semua.
Bagi yang masih kurang jelas bisa bertanya di kolom komentar dibawah ini.
SELAMAT BERKARYA…